

We all use Gmail, right? It’s a staple in the business world and our personal lives, but did you know that there are many hidden features that can enhance your productivity? In this article, we’ll unveil 10 mind-blowing Gmail tricks you never knew that could change the way you manage emails. Buckle up, and let’s embark on this journey of exploring Gmail’s untapped potential.
Gmail is packed with various tricks and features that you might not be aware of. Here are some of the top ones: We are explaining each tricks step by step to use it in Gmail.com
Table of Contents
- Taking Advantage of the ‘Undo Send’ Function
- Becoming a Pro at Using Gmail Labels and Categories
- Unlocking the Potential of Gmail’s Superior Search Feature
- Design and Implementation of Effective Gmail Templates
- Guidelines for Effectively Using Gmail in Offline Mode
- Incorporating Handy Keyboard Shortcuts for Gmail Use
- Leveraging Gmail’s AI Features – Smart Compose and Reply
- How to Efficiently Organize Your Gmail with Multiple Inboxes
- Securing Your Emails with Gmail’s Confidential Mode
- Maximizing Efficiency with the Gmail Tasks Feature
1. Taking Advantage of the ‘Undo Send’ Function
Ever sent an email and immediately regretted it? You can unsend it. Yes, you read that right. Gmail has an ‘Undo Send’ feature. Learn how to activate it and avoid those embarrassing email mishaps.
Step 1: Open Your Gmail
First, open your Gmail account. You can do this by typing www.gmail.com in your web browser.
Step 2: Go to Settings
Once you’re in your Gmail inbox, you’ll see a gear-like symbol on the top right side of the screen. That’s the ‘Settings’ button. Click on it.
Step 3: Click on ‘See all settings’
After clicking on the ‘Settings’ button, a dropdown menu will appear. At the top of the menu, you’ll see an option that says ‘See all settings’. Click on that.
Step 4: Locate the ‘Undo Send’ Feature
Now, you’re in the main settings area. There’s a lot of stuff here, but don’t worry, we’ll find the ‘Undo Send’ feature together. Look for a section that says ‘Undo Send’. It’s there, we promise!
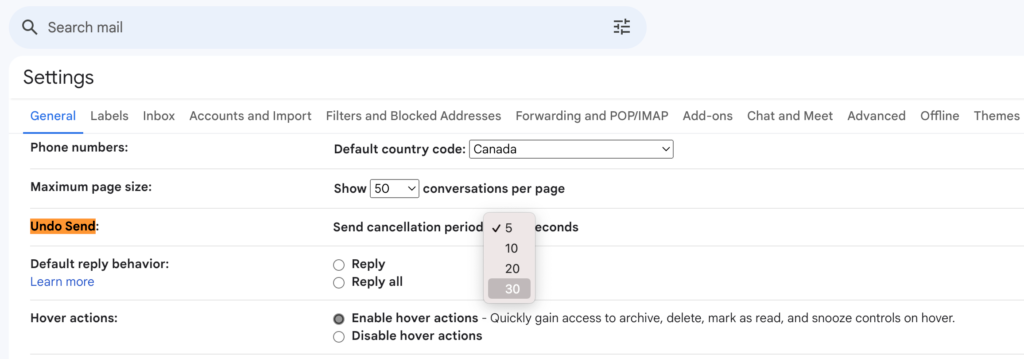
Step 5: Set the ‘Send cancellation period’
Under ‘Undo Send’, you’ll see ‘Send cancellation period’. This is how long Gmail waits before it sends your email, giving you a chance to undo the send. You can choose between 5, 10, 20, or 30 seconds. Choose the time that suits you best.
Step 6: Save Changes
After selecting your cancellation period, don’t forget to click on ‘Save Changes’ at the bottom of the page. If you don’t save, Gmail won’t remember your ‘Undo Send’ settings.
And voila! You’ve now set up the ‘Undo Send’ feature in Gmail. The next time you send an email and realize you’ve made a mistake, look at the bottom of your screen. A box will appear saying ‘Your message has been sent’ and next to it, you’ll see the ‘Undo’ button. Click on it and your email will pop back up, ready for you to fix and send again.
Just remember, you have to click ‘Undo’ within the time you set in your ‘Send cancellation period’. If you wait too long, your email will be sent and you can’t undo it anymore.
2. Becoming a Pro at Using Gmail Labels and Categories
Do you have a favorite email or a collection of something you like? I bet you organize them in a special way so that you can find your favorite one quickly. Gmail’s ‘Labels and Categories’ will help us organize our emails so we can find the one we want without having to look through a huge pile.
Here’s how you can use them:
Step 1: Open Your Gmail
Start by going to your Gmail account. You can do this by typing www.gmail.com into your web browser.
Step 2: Select an Email
Choose an email that you want to label. Click on the checkbox next to it. This will highlight the email and a new menu will appear at the top of the page.
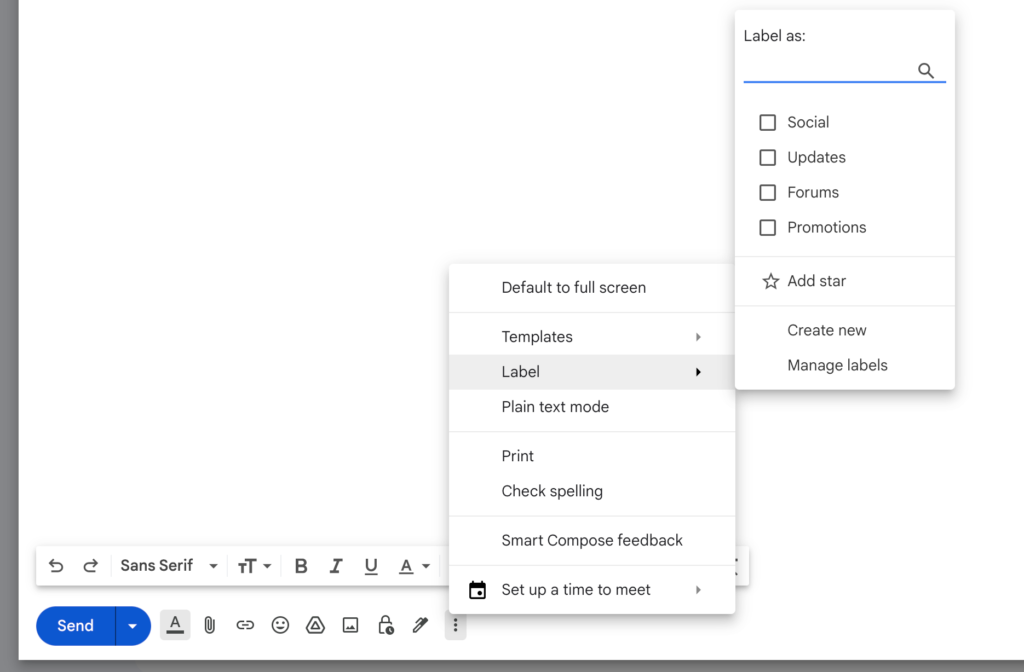
Step 3: Click on the ‘Label’ Icon
On the new menu that appears, look for an icon that looks like a tag. That’s the ‘Label’ icon. Click on it.
Step 4: Create a New Label
A box will pop up with a list of existing labels. You can use one of these, or create a new one. To create a new label, click on ‘Create new’. Type in the name of your label (for example, ‘Homework’, ‘Friends’, ‘Family’) and click ‘Create’.
Step 5: Check Your Label
Now, your email has a label. You can check this by looking at the email in your inbox. It should have a colored box next to it with your label’s name.
Step 6: Finding Your Labeled Emails
Want to see all your emails that have the same label? Easy! Look on the left side of your screen. You’ll see a list of all your labels. Click on the label you want, and Gmail will show you all the emails with that label.
Bonus: Using Categories
Gmail also has a feature called ‘Categories’. These are like super labels that Gmail creates for you. Emails are automatically sorted into categories like ‘Primary’ (important emails), ‘Social’ (emails from social media), and ‘Promotions’ (sales and deals).
To check your categories, click on the ‘Inbox’ tab on the left side of the screen. Then, at the top of your inbox, you’ll see tabs for each category. Click on a tab to see the emails in that category.
And there you go! You’re now a master of labels and categories in Gmail. These tools help you keep your inbox tidy, so you can find any email you want.
3. Unlocking the Potential of Gmail’s Advanced Search Feature
Have you ever played a game where you have to find hidden objects? Gmail’s ‘Advanced Search’ is kind of like that. It’s a super tool that helps you find any email you’re looking for, no matter how hidden it is in your inbox. Here’s how you use it:
Step 1: Open Your Gmail
Your first step is always to go to your Gmail account. You can do this by typing www.gmail.com into your web browser.
Step 2: Click on the ‘Search’ Box
At the top of your Gmail page, you’ll see a big box that says ‘Search mail’. Click on it.
Step 3: Click on the ‘Show Search Options’ Arrow
On the right side of the search box, you’ll see a small arrow pointing down. Click on that arrow. This will bring up Gmail’s ‘Advanced Search’ options.
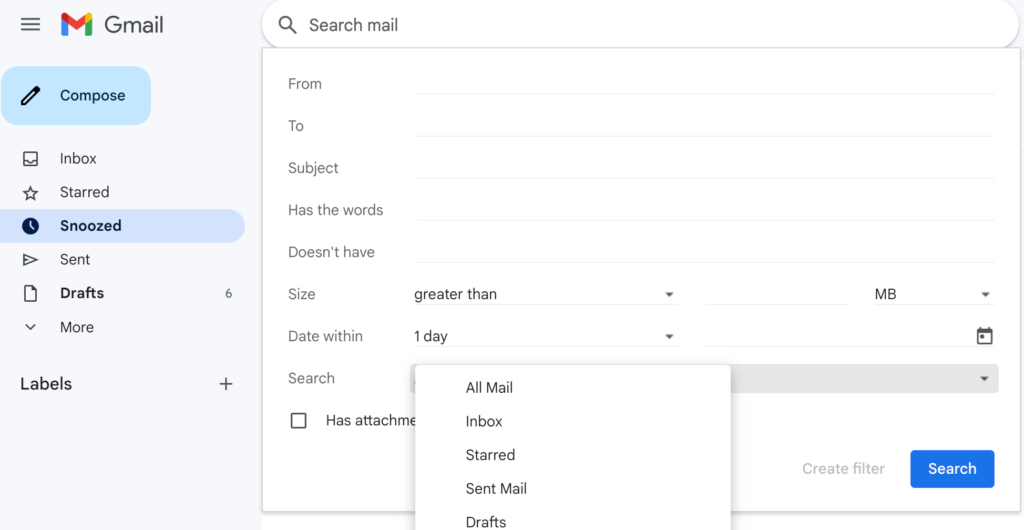
Step 4: Use the Search Options
Now, you’ll see a lot of different boxes. Each one helps you search for something specific in your emails. For example:
‘From’: Use this to find emails from a certain person.
‘To’: Use this to find emails you sent to a certain person.
‘Subject’: Use this to find emails about a specific topic.
‘Has the words’: Use this to find emails that contain certain words.
‘Has attachment’: Check this box to find emails with attachments.
You can fill in as many or as few boxes as you want. The more you fill in, the more specific your search will be.
Step 5: Click ‘Search’
Once you’ve filled in the options you want, click on the ‘Search’ button at the bottom of the search options. This will close the options and start the search.
Step 6: Check Your Results
Now, Gmail will show you all the emails that match your search. It’s like digging up treasure that was buried in your inbox!
And that’s how you use Gmail’s ‘Advanced Search’. Remember, the more clues you give Gmail (by filling in the search options), the better it can help you find your email treasure!
If the emails go to other folders go through the steps listed here to find them.
4. Design and Implementation of Effective Gmail Templates
Have you ever built something using any powerpoint template? You might have a favorite design that you build over and over again. Email templates in Gmail are like your favorite template design. They’re emails that you set up once and can then use again and again. Here’s how to do it:
Step 1: Open Your Gmail
The first step is to open your Gmail account. Just type www.gmail.com into your web browser to get there.
Step 2: Click on the ‘Settings’ Gear
On the top right corner of your Gmail page, you’ll see a gear icon. That’s the ‘Settings’ button. Click on it.
Step 3: Select ‘See all settings’
A dropdown menu will appear when you click on ‘Settings’. From this menu, select ‘See all settings’. This will take you to a page with lots of different options.
Step 4: Go to the ‘Advanced’ Tab
On the ‘Settings’ page, you’ll see a row of tabs at the top. One of them is called ‘Advanced’. Click on that tab to go to the ‘Advanced’ settings scroll down and enable Templates then save bottom left.
Step 5: Click on ‘Compose’
Once you’re in your Gmail inbox, click on the ‘Compose’ button on the left side. This will open a new email.
Step 6: Write Your Email
Write the email you want to use as a template. You can add a subject and body just like any other email.
Step 7: Go to ‘More Options’
Once you’re done writing your email, look at the bottom right corner of the email window. There’s an icon with three dots. That’s the ‘More Options’ button. Click on it.
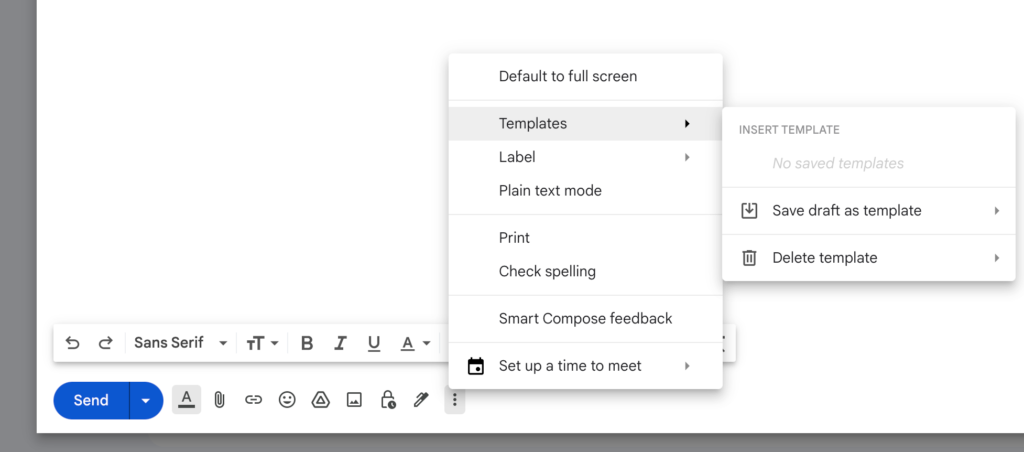
Step 5: Click on ‘Templates’
A dropdown menu will appear when you click on ‘More Options’. From this menu, select ‘Templates’.
Step 6: Save Your Template
Another menu will pop up. This one has all your templates. Since we’re saving a new template, click on ‘Save draft as template’, then ‘Save as new template’.
Step 7: Give Your Template a Name
Gmail will ask you to give your template a name. This can be anything you want. Once you’ve named it, click ‘Save’.
Congratulations! You’ve just created your first email template.
Step 8: Using Your Template
Want to use your template? Start a new email, just like before. Click on ‘More Options’, then ‘Templates’. You’ll see your saved template in the list. Click on it, and your email will be filled in with your template.
And that’s how you create and use email templates in Gmail! Just remember to replace any placeholder text with your real message each time you use the template.
5. Guidelines for Effectively Using Gmail in Offline Mode
Imagine you’re going camping in a place where there’s no internet. But you still want to read your favorite book, so you bring it with you. Gmail Offline is like that book. It lets you read and write emails even when there’s no internet. Let’s see how you can use it:
Step 1: Open Your Gmail
The first step is to open your Gmail account. Just type www.gmail.com into your web browser to get there.
Step 2: Click on the ‘Settings’ Gear
On the top right corner of your Gmail page, you’ll see a gear icon. That’s the ‘Settings’ button. Click on it.
Step 3: Select ‘See all settings’
A dropdown menu will appear when you click on ‘Settings’. From this menu, select ‘See all settings’. This will take you to a page with lots of different options.
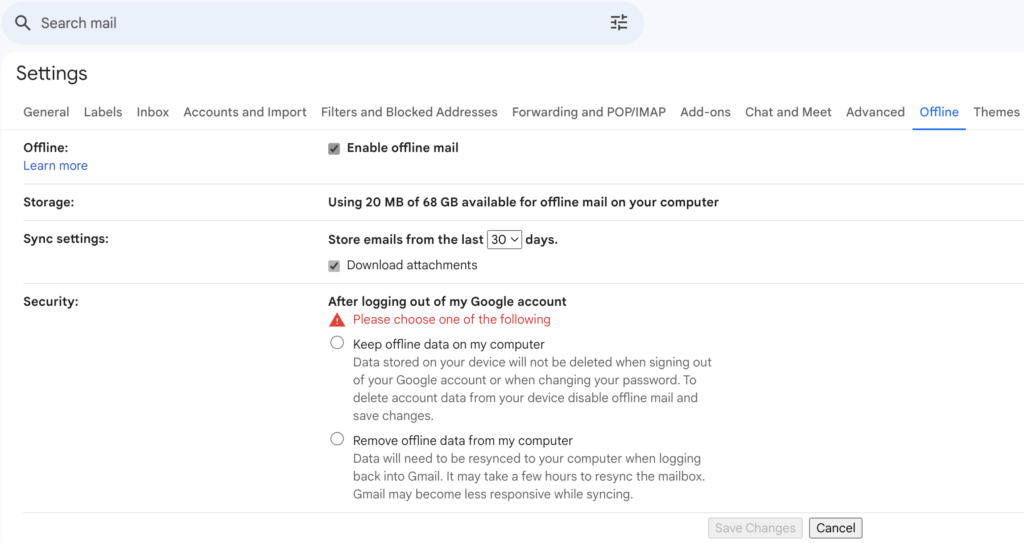
Step 4: Go to the ‘Offline’ Tab
On the ‘Settings’ page, you’ll see a row of tabs at the top. One of them is called ‘Offline’. Click on that tab to go to the ‘Offline’ settings.
Step 5: Enable ‘Offline Mail’
You’ll see an option that says ‘Enable offline mail’. Check the box next to this option to turn on Gmail Offline.
Step 6: Choose Your Settings
Now, you get to choose how many days of emails you want to store offline, and whether or not to download attachments. Choose the options that work best for you.
Step 7: Save Changes
Once you’ve chosen your settings, don’t forget to click ‘Save Changes’ at the bottom of the page.
Step 8: Accessing Your Emails Offline
Now, even when you’re not connected to the internet, you can open Gmail and read your emails, write replies, and even search for old emails. Just like how you can read your book while camping. The next time you connect to the internet, Gmail will send any emails you wrote and update your inbox with any new emails.
And that’s how you use Gmail Offline!
6. Incorporating Handy Keyboard Shortcuts for Gmail Use
Do you like secret codes? Keyboard shortcuts are like secret codes that you can use to do things faster in Gmail. You press a few keys, and poof! You’ve done something without even clicking. Here’s how you can start using these shortcuts:
Step 1: Open Your Gmail
Your first step is always to go to your Gmail account. You can do this by typing www.gmail.com into your web browser.
Step 2: Go to ‘Settings’
On the top right corner of your Gmail page, you’ll see a gear icon. That’s the ‘Settings’ button. Click on it.
Step 3: Click on ‘See all settings’
A dropdown menu will appear when you click on ‘Settings’. From this menu, select ‘See all settings’.
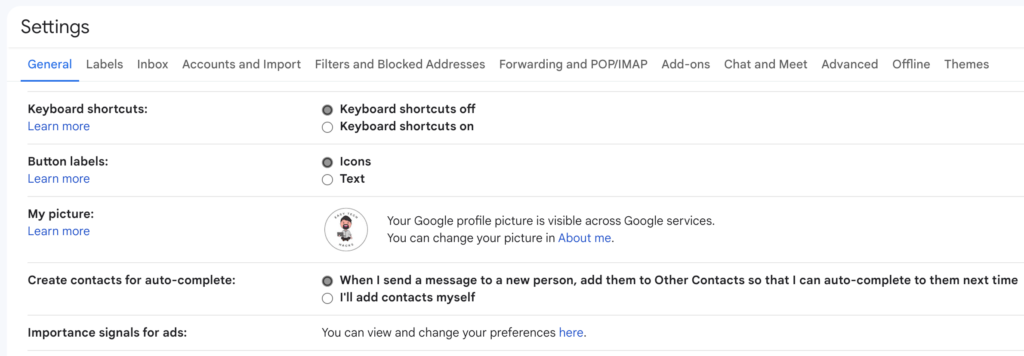
Step 4: Scroll Down to ‘Keyboard Shortcuts’
In the ‘Settings’ page, scroll down until you find the ‘Keyboard Shortcuts’ section.
Step 5: Enable ‘Keyboard Shortcuts’
Click on ‘Keyboard shortcuts on’. This will let you use the secret codes!
Step 6: Save Changes
Once you’ve turned on ‘Keyboard shortcuts’, scroll down to the bottom and click on ‘Save Changes’.
Now, let’s look at some of the cool shortcuts you can use:
‘C’: This is like pressing the ‘Compose’ button. It opens a new email for you to write.
‘Enter’: This opens an email for you to read. It’s like double-clicking an email with your mouse.
‘E’: This archives the email you’re reading or have selected. It’s like clicking the ‘Archive’ button.
‘/#’: This moves the email you’re reading or have selected to the trash. It’s like clicking the ‘Trash’ button.
‘S’: This stars or un-stars an email. It’s like clicking the ‘Star’ button.
And there you have it! Those are some basic Gmail keyboard shortcuts. They’re like secret codes that help you use Gmail faster. But remember, the most important secret code is practice. The more you use them, the faster you’ll get!
7. Leveraging Gmail’s AI Features – Smart Compose and Reply
Imagine you had a magic pen that knew what you wanted to write before you even put it to paper. Wouldn’t that be amazing? That’s what Smart Compose and Smart Reply in Gmail do. They’re like magic pens that help you write emails faster. Let’s see how to use them:
Step 1: Open Your Gmail
As always, the first step is to open your Gmail account. You can do this by typing www.gmail.com into your web browser.
Step 2: Click on ‘Settings’
Once you’re in your Gmail inbox, look at the top right corner of the page. You’ll see a gear icon. That’s the ‘Settings’ button. Click on it.
Step 3: Select ‘See all settings’
A dropdown menu will pop up when you click on ‘Settings’. Select ‘See all settings’ from this menu.
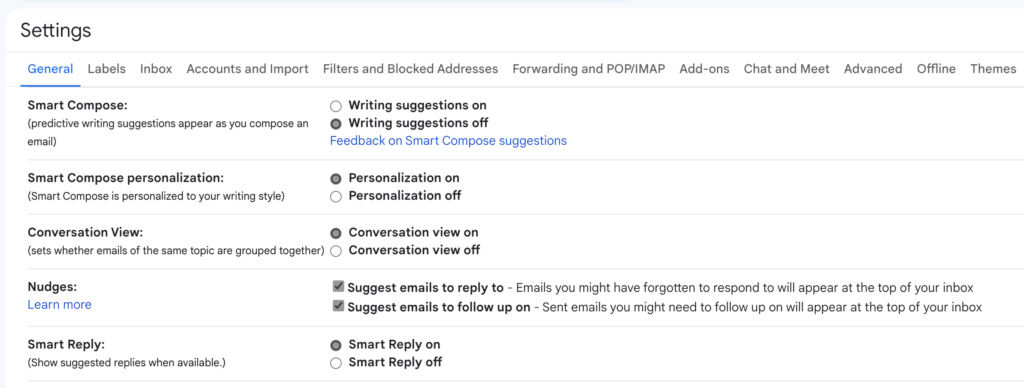
Step 4: Scroll Down to ‘Smart Compose’ and ‘Smart Reply’
In the ‘Settings’ page, scroll down until you find the ‘Smart Compose’ and ‘Smart Reply’ sections.
Step 5: Enable ‘Smart Compose’ and ‘Smart Reply’
Check the boxes next to ‘Smart Compose’ and ‘Smart Reply’ to turn them on.
Step 6: Save Changes
Don’t forget to scroll down and click ‘Save Changes’ once you’ve turned on ‘Smart Compose’ and ‘Smart Reply’.
Step 7: Using Smart Compose
Now, when you’re writing an email, Gmail will suggest words or phrases as you type. It’s like your magic pen is guessing what you want to write! If you see a suggestion you like, hit the ‘Tab’ key to accept it.
Step 8: Using Smart Reply
When you receive an email, Gmail might show you some short replies at the bottom of the email. These are Smart Replies. If you see a Smart Reply that says what you want to say, click on it, and Gmail will add it to your reply.
And that’s it! You’ve just learned how to use Smart Compose and Smart Reply in Gmail.
8. How to Efficiently Organize Your Gmail with Multiple Inboxes
Imagine you’re organizing your desk. You put your books on one side, your gadgets on another, and your pens on a third side. That way, when you need something, you know exactly where to find it. Multiple Inboxes in Gmail is a bit like that. It lets you separate your emails into different sections. Here’s how to do it:
Step 1: Open Your Gmail
Your first step is to go to your Gmail account. You can do this by typing www.gmail.com into your web browser.
Step 2: Click on ‘Settings’
On the top right corner of your Gmail page, you’ll see a gear icon. That’s the ‘Settings’ button. Click on it.
Step 3: Select ‘See all settings’
A dropdown menu will pop up when you click on ‘Settings’. From this menu, select ‘See all settings’.
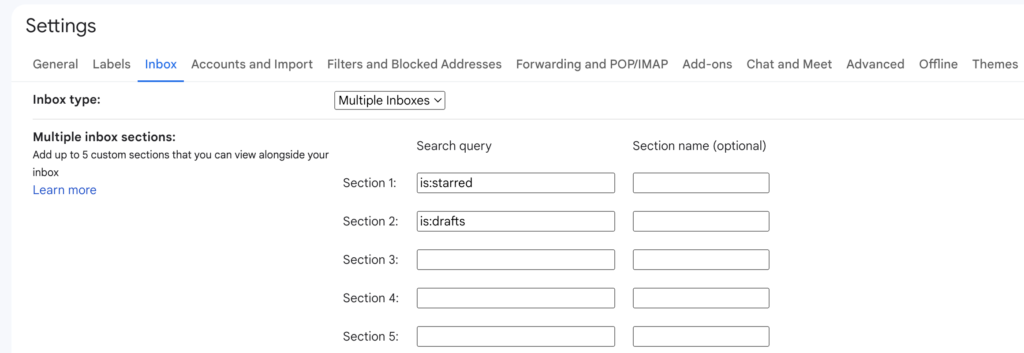
Step 4: Go to the ‘Inbox’ Tab
In the ‘Settings’ page, look at the top for a row of tabs. One of them will say ‘Inbox’. Click on that tab.
Step 5: Change ‘Inbox type’ to ‘Multiple Inboxes’
Now, look for a dropdown menu that says ‘Inbox type’. Click on this menu, and select ‘Multiple Inboxes’.
Step 6: Set Up Your Inboxes
Underneath ‘Inbox type’, you’ll see a section to set up your different inboxes. You can decide what kind of emails go into each inbox. For example, you could have one inbox for emails from your friends, and another for emails from your colleagues.
Step 7: Save Changes
Once you’ve set up your inboxes, don’t forget to click ‘Save Changes’ at the bottom of the page.
And there you have it! You’ve just set up Multiple Inboxes in Gmail. It’s like having different sections on your desk for different kinds of emails. Now, when you need to find an email, you’ll know exactly where to look.
9. Securing Your Emails with Gmail’s Confidential Mode
Did you ever wish you could send a message that automatically disappears after a while? Or a message that needs a special password to open? Confidential mode in Gmail can do just that. It’s like being a secret agent. Here’s how to use it:
Step 1: Open Your Gmail
The first thing you need to do is go to your Gmail account. You can do this by typing www.gmail.com into your web browser.
Step 2: Compose a New Email
Once you’re in your Gmail inbox, click on the ‘Compose’ button. This will open a new email for you to write.
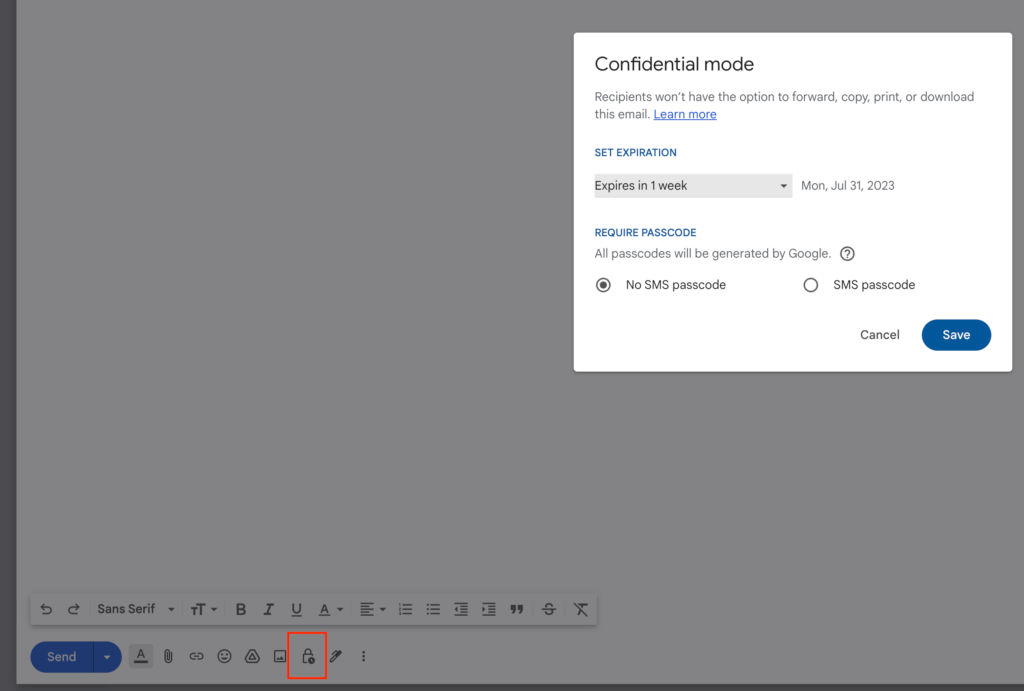
Step 3: Click on the ‘Confidential Mode’ Icon
At the bottom of the new email, you’ll see a row of icons. One of them looks like a clock with a padlock. This is the ‘Confidential Mode’ icon. Click on it.
Step 4: Set Your Confidential Mode Settings
A window will pop up with options for you to set your confidential mode settings. Here, you can decide how long the email can be read before it disappears, and whether the receiver needs a password to open the email. Make your choices, then click ‘Save’.
Step 5: Write and Send Your Email
Now, you can write your email as usual. When you’re ready, click ‘Send’. The email will be sent with the confidential mode settings you chose.
And that’s it! You’ve just learned how to send an email in confidential mode. It’s like sending a secret message that can only be read for a certain amount of time, or with a special password. But remember, even secret agents need to be responsible. Only use confidential mode when you really need to.
10. Maximizing Efficiency with the Gmail Tasks Feature
Have you ever wished you had a to-do list that could remind you when it’s time to do something? Maybe to remind you to do your homework, or to walk your dog, or to say happy birthday to your friend. Gmail Tasks can do just that. It’s like your very own digital assistant. Here’s how to use it:
Step 1: Open Your Gmail
The first thing you need to do is go to your Gmail account. You can do this by typing www.gmail.com into your web browser.
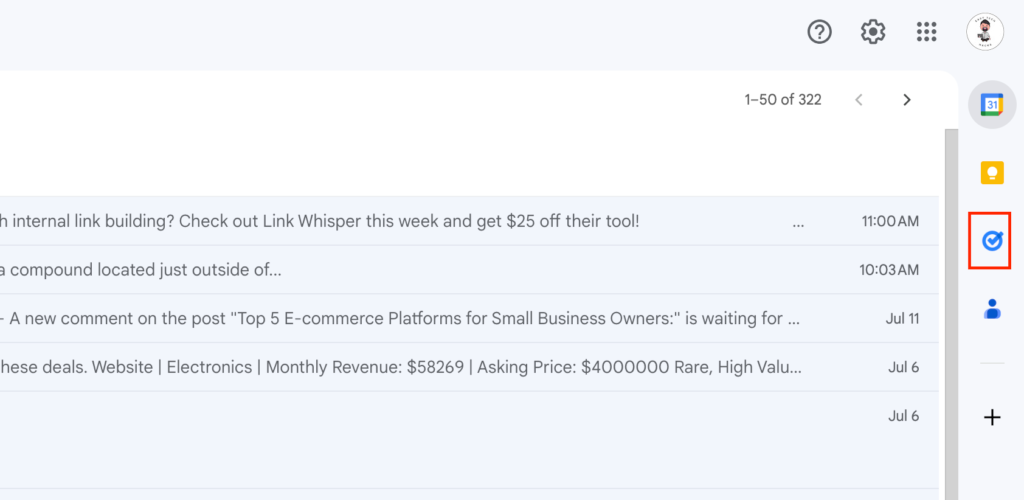
Step 2: Click on the ‘Tasks’ Icon
Once you’re in your Gmail inbox, look on the right side of the page. You’ll see a sidebar with several icons. One of these icons looks like a blue circle with a white and yellow tick inside. That’s the ‘Tasks’ icon. Click on it.
Step 3: Add a New Task
After clicking on the ‘Tasks’ icon, a sidebar will open. At the bottom of this sidebar, you’ll see a plus sign (+). Click on it to add a new task.
Step 4: Write Your Task
Now, you can write what you need to do. For example, you might write ‘Do math homework’ or ‘Walk the dog’. Once you’ve written your task, hit ‘Enter’ on your keyboard to add it to your to-do list.
Step 5: Set a Date and Time
If you want, you can set a date and time for your task. To do this, click on the pencil icon next to the task you just added. Then, select ‘Add date/time’. You can choose the date and time when you want to be reminded of this task. Once you’ve set the date and time, click ‘Back’.
Step 6: Marking a Task as Complete
Once you’ve completed a task, you can tick it off your list. To do this, click on the circle next to the task. The task will then be crossed out, showing that you’ve completed it.
And there you have it! You’ve just learned how to use the Gmail Tasks feature. It’s like having a digital assistant that helps you remember what you need to do.


